


5 Tips To Take Better Furniture Photos
- Brass Tacks
- Jul 15, 2018
- 4 min read

I would like to start this blog off by stating that I am not an expert in the field of photography. I have, however, significantly improved my picture taking capabilities over the last 3 years of being in business.


Above on the left is a picture taken in our first year of business.
On the right is a picture of a very similar sized desk taken in early 2018
I didn't get good on my own and I have to admit that I was in super denial that I needed any help at all. (That picture on the left isn't horrible, right.......) It's all about goals and expectations. Once my goal changed to wanting my pictures to be SCROLL STOPPERS, that picture on the left just wasn't going to cut it anymore.
Andrea being Andrea found a free group for us to follow on Facebook. Flipping Furniture for Profit was such a great resource for us. It's no longer a free resource, but if you are serious about making an online business work, especially a furniture based one I wouldn't hesitate to pay the monthly fee to learn some very valuable picture taking methods.
Here are 5 things that really stuck with me from that free group and some self lessons.
1. Your background is SUPER important.
In the beginning we took photos of furniture wherever that piece of furniture happened to be. This happened for 3 reasons
we didn't make photos a priority
there was no dedicated space for taking pictures
we were a bit lazy about it
The first step in becoming serious about taking quality staged photos was setting up a dedicated background area to stage our furniture on. We went through several stages of picture walls. Hanging cloth backgrounds, bare walls, and finally a whitewashed wood look panel board. Once we had the panel board we placed the furniture on the concrete, then upgraded to some vinyl wood flooring, and finally a piece of matching whitewashed panel board.
The trick is to get your background as neutral as possible so that your furniture piece/product is what jumps out at your potential customer. We are even considering changing our set up again because the grey in our panels can sometimes pop out. (Once you start getting better photos you never stop chasing that perfect photo!)
2. You Want A Lot of Light
This is actually very easy and inexpensive. Go online and find yourself a lighting umbrella kit. Ours came with two lights, 4 shades, bulbs, and the posts. We use this everyday, for every picture.
(To the left is our Amazon Affiliated link for the lighting package we purchased)
Below is an example of a picture without lighting (left) and with lighting (right).


If you have a room with great natural light this won't be as drastic, but remember you are prisoner to taking pictures during a certain time of day and cross your fingers it's sunny out!
3. You Can Hold Your Phone Wrong
Yes this happens and is a real thing! There are a couple ways you can hold your phone/camera wrong. One is tilting the top forward. This is most noticeable on taller furniture pieces. The other way is where you are holding your camera when taking the photo. It is best to be in looking at your piece straight on from the front. You don't want to be above looking down at the piece.


Photo on left camera is tilted forward and taken from above.
Photo on right camera is level and taken straight on to front of dresser.
This is actually VERY difficult sometimes. Keeping your camera level while at the same time positioning yourself in a way to keep everything looking square and fitting in the frame can be a huge challenge. It takes a little practice and more then a couple times doing it wrong and going back for a second, third, forth, or even fifth shot.
4. Square Images are Best.
If you plan on sharing your images on social media or even your website, square images always seems to work best. They don't get cut off when the social media gods take them and post them. I try to take all of my photos in square mode on my phone, but sometimes that's just not possible. In the case that I need all the room of a full picture view, I try to leave as much space around my piece of furniture so that I can crop it to a square image after taking the photo.


Picture on top left taken in square mode, picture on top right taken in full picture view then edited into square. These may not look too different, but when I tried to upload them onto our website this is how they looked, below.

5. There's a true art to staging the tops of your pieces.
Figuring out what pretty pieces to decorate your pieces with and how to place them is part science and part intuition. It took me a VERY long time to get the hang of it and I'm still not always 100% happy or sure of my top staging. Some general rules to follow:
fill 2/3 the length of your top.
center them booth length and width wise
decor should be no taller then 1/2 the height of your piece
use items that are a pop of color and/or pull from the accents on your furniture piece such as hardware
fake flowers and greens are your BFF
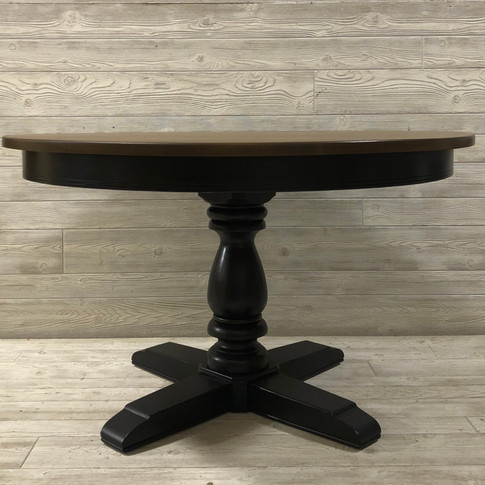
Here are some photos I'm pretty proud of.
Some even break "the rules" a bit, but its okay if it works right?


Getting those SCROLL STOPPER images takes a bit of work and a lot of dedication. In the beginning I wasn't really that invested into getting that perfect shot and it showed. Even now I sometimes feel like I just want to get them done and move onto the next task, but when I take the time to stage properly and get a good shot I'm NEVER disappointed.
If you are thinking about upping your photo game, my advice to you is to commit all the way, right away! Get your background and lighting situation set up, collect a variety of staging items, and consider joining a group that will give you constructive criticism that will better you and your business.
Here is a link to the Flipping Furniture for Profit group we learned so much from!

Comments